I once tried to buy a pair of headphones I really wanted. But when I got to the checkout page, the store asked me to sign in.
Since it was just a one-time purchase, I didn’t want to create an account and start getting promotional emails. So, I left and found the same model somewhere else.
That’s when it hit me—many online shoppers probably do the same thing.
Curious, I started digging and found that WooCommerce actually offers a built-in guest checkout option. It’s a simple setting that can save sales you’d otherwise lose at the very last step.
That’s why I created this guide—to walk you through everything you need to know about guest checkout in WooCommerce.
By the end, you’ll know how to set up guest checkout correctly and turn more visitors into paying customers. 🚀
Here is a quick overview of all the topics I will cover in this guide:
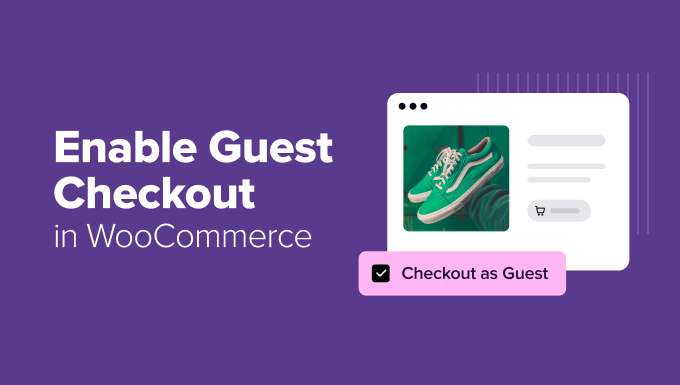
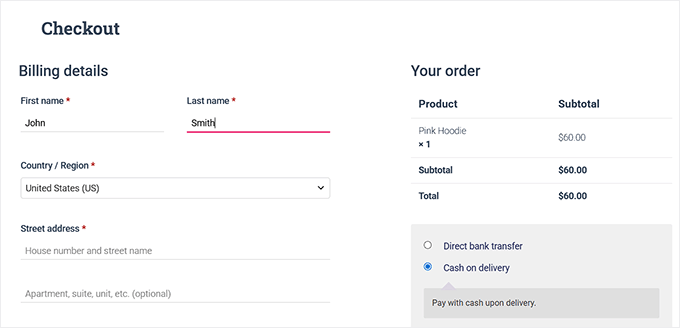
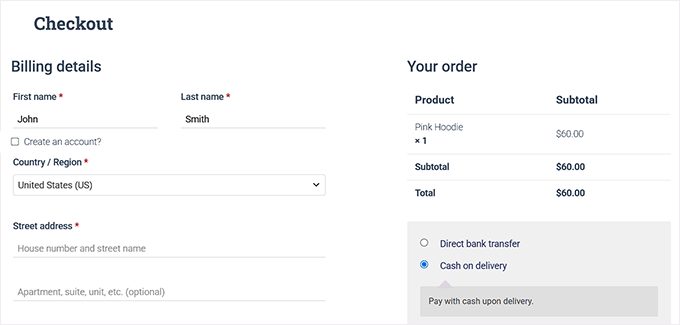
Guest checkout lets customers buy from your WooCommerce store without creating an account on your website.
Instead of signing up or logging in, they can simply add items to their cart, enter their details at checkout, and complete the purchase.
Think of it like walking into a physical store: you grab what you need, pay at the counter, and leave, with no membership or signup required.
This option speeds up the shopping process and makes it more convenient, especially for first-time or one-time buyers.
Benefits of Guest Checkout in WooCommerce
Enabling guest checkout improves the shopping experience for customers and helps store owners make more sales.
It removes extra steps, reduces frustration, and makes shopping smoother. Here’s a simple breakdown:
For Store Owners 🛍️
For Customers 🙌
Higher conversion rates – More people finish their orders since they don’t have to create an account.
Faster, hassle-free checkout – Shoppers can pay and go in just a few clicks.
No forced sign-up – Customers don’t feel pressured to share extra details.
Faster impulse purchases– Perfect for one-time or last-minute buys.
Privacy and trust– Shoppers can keep their data limited to what’s needed for delivery.
Email capture is still possible– You can still collect shoppers’ emails for receipts or future marketing.
More control– Customers can decide later if they want to create an account.
👉 In short: guest checkout helps store owners sell more while giving customers a simpler, stress-free shopping experience.
When to Use Guest Checkout (Best Scenarios)
Guest checkout can help you get more sales, but it’s not ideal for every situation.
For example, stores selling high-value items or subscriptions may require accounts for security and long-term management.
From what I’ve seen, guest checkout works best when customers want a quick, hassle-free purchase.
Some common scenarios include:
👋First-time customers – Make it easy for new visitors to finish their first order.
🎁Gift purchases – People buying gifts often don’t want to create an account.
💸Low-cost, one-time products – Quick buys don’t need long-term accounts.
💻Digital downloads – Instant access to files without extra steps.
Using guest checkout in these situations can reduce friction and help more visitors complete their purchases.
How to Enable Guest Checkout in WooCommerce
The easiest way I found to enable guest checkout was by using WooCommerce’s default settings.
WooCommerce is the best eCommerce plugin for WordPress, and it gives you complete control over your online store. That’s why it’s my top recommendation for selling physical products.
We also have a detailed WooCommerce review you can check out to learn more about all its built-in features and options.
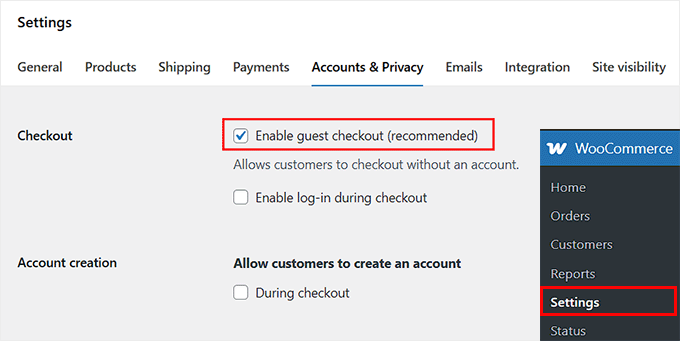
To enable guest checkout, you need to visit the WooCommerce » Settings »Accounts & Privacy page.
Here, you’ll see an option labeled ‘Enable guest checkout (recommended).’
This setting allows people to buy without creating a username or password. Go ahead and tick that box to enable guest checkout for your store.
Once that’s done, simply click the ‘Save Changes’ button to store your settings.
You can now visit your online store and test the checkout to make sure everything is working properly.
Optimize Your Store with Merchant
Merchant by aThemes is an all-in-one WooCommerce plugin that helps improve your store and optimize the checkout.
It offers features like stock scarcity notifications, free shipping bars, and buy X, get Y promotions.
These modules help reduce cart abandonment and encourage guests to finish their orders without making the checkout process complicated.
While exploring the guest checkout settings, I noticed a few other options on the same page that can improve your checkout experience.
You don’t have to use all of them, but knowing what’s available can help you tailor the experience.
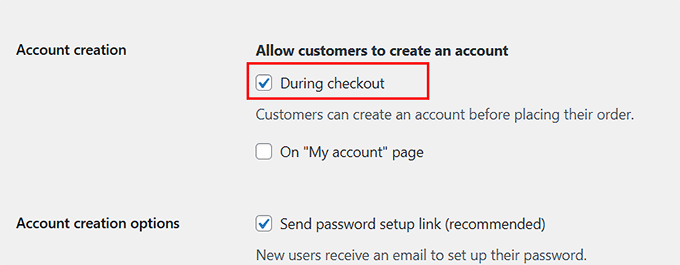
Let Shoppers Create an Account During Checkout
You can also give customers the option to create an account during checkout. WooCommerce can even auto-generate usernames and passwords, so customers don’t have to think about it.
To turn it on, go to WooCommerce » Settings » Accounts & Privacy and tick ‘During Checkout’ for the ‘Allow customers to create an account’ setting.
This gives you the best of both worlds: a fast guest checkout flow that still lets users sign up seamlessly without redirecting them to a separate registration page.
This comes in handy when you want repeat shoppers to save their information for next time. It also helps people who like to track orders or save shipping addresses.
This setup is ideal for stores where customers are likely to return for future purchases.
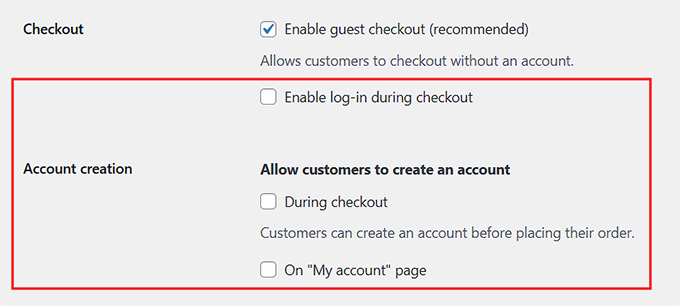
Force Guest-Only Checkout
Sometimes, you may want to skip accounts altogether and keep the checkout 100% guest-only. To do this in WooCommerce, you need to disable both account creation and login options during checkout.
Just go to WooCommerce » Settings » Accounts & Privacy and untick the account creation options. Then, also make sure to uncheck the ‘Enable log-in during checkout’ option.
Once these settings are turned off, shoppers can only check out as guests.
This setup works really well for quick, one-time purchases, like digital downloads, seasonal items, or flash sales.
Shoppers can complete their order quickly without extra steps, which is exactly what they want in these scenarios.
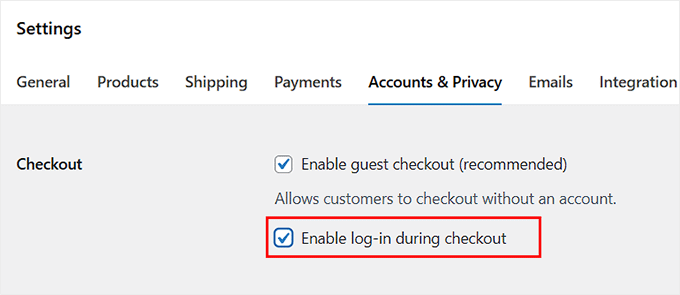
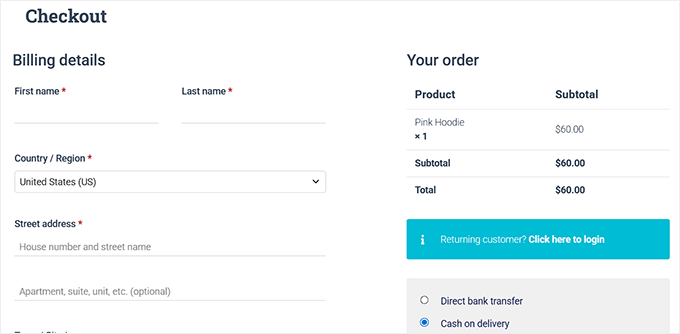
Let Returning Customers Log In During Checkout
You can also let returning buyers log in during checkout instead of going through the guest flow.
Just tick ‘Enable log-in during checkout’ on the WooCommerce » Settings » Accounts & Privacy page. This makes things easier for people who have shopped with you before.
They can grab saved addresses, check past orders, and finish their purchase faster.
It’s perfect if your store has a mix of new and repeat shoppers, or subscription-based products where returning buyers benefit from logging in.
🏆 Quick Wins to Improve Guest Checkout
Now that your guest checkout is set up, the next step is to make things even smoother for your shoppers.
Here are some quick tips I find most effective for boosting conversions and giving shoppers a better experience:
✨Simplify the checkout flow: Combine shipping and billing sections and remove unnecessary fields. Fewer steps = faster checkout.
🏠Enable address autocomplete: Let the checkout form suggest addresses while typing. This speeds up checkout and reduces errors.
✅Add inline validation: Highlight mistakes as customers type so they can fix them right away.
📱Ensure mobile-friendly design: Most shoppers use phones, so make sure your checkout works smoothly on small screens.
🛤️Show progress indicators: Let customers see how many steps are left in the checkout process.
💳Offer multiple payment options: Give buyers a choice so they can pay in the way that’s easiest for them.
📝Use clear, concise field labels: Avoid confusion by keeping labels short and easy to understand.
I recommend trying a few of these quick tips because they’re super easy to implement and can make an immediate difference in your checkout experience.
To learn how to set up these strategies, check out our guide on how to create a faster checkout experience in WooCommerce.
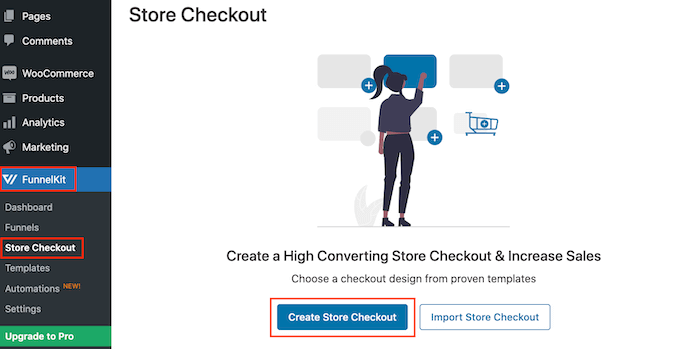
🚀 Take Guest Checkout Further with FunnelKit
The tips I just covered are great quick wins. But if you really want to take your guest checkout to the next level, FunnelKit Funnel Builder is worth checking out.
It lets you fully customize your WooCommerce checkout, making the experience smoother and more tailored for your shoppers.
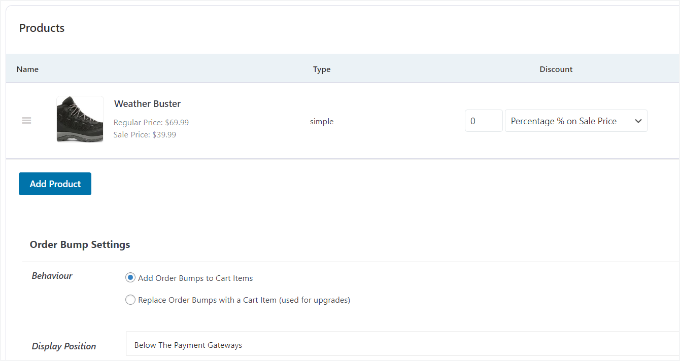
I’ve thoroughly tested FunnelKit and found it very reliable. This powerful WooCommerce plugin offers features like rearranging checkout fields, adding upsells / cross-sells, sticky add-to-cart buttons, countdown timers, cart reserved timers, and progress bars.
You can also highlight recently viewed products, show complementary items, and create a guided checkout flow to reduce abandoned carts.
To see exactly how to use FunnelKit and customize your WooCommerce checkout, take a look at our step-by-step guide on how to customize the WooCommerce checkout page.
Frequently Asked Questions About WooCommerce Guest Checkout
A few of our readers have asked about guest checkout, so I’ve put together answers to the most common questions:
Is guest checkout secure?
Yes! Guest checkout is just as secure as a regular WooCommerce checkout. All payment processing is handled by your payment gateway, so customer data is protected.
Can I collect customer emails without forcing them to create an account?
Absolutely. Even with guest checkout, WooCommerce still collects the customer’s email during checkout.
This allows you to send transactional emails, such as order updates, receipts, and shipping notifications. If the customer opts in, you can also send marketing emails later—all without requiring them to create an account.
Can I disable guest checkout later?
Yes, you can. If you ever decide that only registered users should buy, simply go to WooCommerce » Settings » Accounts & Privacy and untick the guest checkout option.
How do I track guest orders?
Guest orders are saved in WooCommerce just like regular orders. As a store owner, you can view them on the Orders page and filter by customer email.
From the customer’s perspective, they can check their status on your website’s ‘Track Your Order’ page by entering their Order ID and email, or simply rely on the email updates sent by WooCommerce.
I hope this article helped you learn how to easily enable guest checkout in WooCommerce. You may also want to see our guide on how to add weight-based shipping in WooCommerce or our expert tips to recover abandoned carts on your store.
If you liked this article, then please subscribe to our YouTube Channel for WordPress video tutorials. You can also find us on Twitter and Facebook.
The post How I Set Up Guest Checkout in WooCommerce in Just 5 Minutes first appeared on WPBeginner.


Leave a Reply